One of the aspects of miniature modeling I enjoy the most is creating my own accessories. Not only is it a great outlet for creativity, it keeps my hobby budget in line. My first mentor in the hobby, who was as imaginative as she was resourceful, taught me: "Don't just look at things for what they are; think about what they could be." As I grew older, I came to appreciate not only of the wisdom of that advice, but its broader applications.
Often I'll challenge myself to "MacGyver" an item, mostly for the fun of it, but sometimes out of sheer necessity, whether it's because I'm limited at that moment to whatever
materials are already at hand, or because whatever I have in mind is just begging to be done completely from scratch. I hope whatever DIY projects I document here prove helpful to some, at least mildly entertaining to all, and inspire others in their own DIY efforts, especially in coming up
with improvements and completely new creations. :-)
DIY Photo Booth From A Box
I did my first "DIY box photo booth" during a visit to family that wound up stretching well beyond the original travel plan. I do have a "regular" tabletop, folding photo booth my
husband bought for me as a Christmas gift years ago, and I love it and use it extensively. However, at the time, it and I were on opposite coasts. I'd just lassoed a couple of likely show prospects, and was getting the itch to do some model photos. Being away from all my usual props, tools, and supplies, I had to cast around for household items that could be put to use. I was further challenged
in that "household items" has a rather broader defintion in my own houshold. ;-)
The resulting "Box Booth 1.0" is scaled for 1/32 Breyer Stablemates and similar size models. Along the way, I also made a prop fence from wooden coffee stirring-sticks, watercolor kids craft paint, and Elmer's Glue. I did cheat and buy an inexpensive pack of dollhouse "lawn" from Amazon for the footing. Sometimes the best decision in a DIY project is which things not to "DIY". ;-D The original setup worked so well, I've since made another here at home. I still use my folding photo booth, particularly for specialty shots and eBay auction photos, but I find the box booth is increasingly my go-to for diorama setups.
PROS with the Box Booth: It's extremely lightweight, fairly sturdy, super easy to make/use, and utterly disposable. There's no folding or unfolding; just grab it and go. The
stiff, flat cardboard "floor" lets you put it pretty much anywhere you want, the stiff, flat back is perfect for hanging backdrops, and you can set up just about any scene you
can fit within. I've used it indoors and out. The semi-open sides allow you to take advantage of whatever light is in your shooting area. Got a little dirt or stray leaves
in it from an outdoor shoot? Need to remove the last of some loose footing from an indoor setup? Turn it upside down and smack it a few times. No worries about breaking it; it's very replaceable. :-D
This sucker really does let you turn any space where there's a place to set it down into a temporary photo studio.
CONS: Really, the only one that bugs me is I haven't figured out a good (read: EASY) way to make it foldable for storage without the cardboard seam between the floor and the back
wearing out quickly, not to mention removing the side supports. And, of course, to do one for bigger models, you need a bigger box, and then space/storage becomes a bigger issue.

All you need is a box the right size for your models, clear packing tape, and sturdy scissors or a box cutter (a ruler helps if you're OC like me, lol). Here I've turned my chosen box upside down, to show the dimensions printed on the bottom, and lined up my tools, all ready to go.

STEP ONE: Looking down into the box, I'm going to "un-box" it first by cutting off the sides at the two narrower ends. I don't need those two extra floor "flaps" that bend up, either, but those will come away with the ends I cut off the box. Keep those pieces, though, as they will come in handy later.
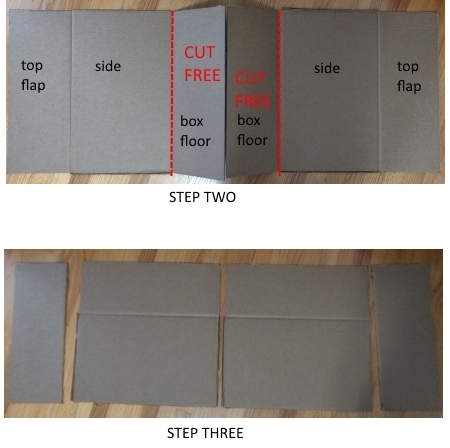
Now I have one long flat piece, still joined by the tape that holds the two remaining flaps of the box bottom together. For Step Two, I cut through the tape to separate the two "halves", and then cut the two bottom flaps free as well. This leaves me, at Step Three, with the makings for TWO Box Booths: consisting of one large and one small piece each. I put one pair of pieces aside as spares. If you're feeling ambitious, you can certainly make two box booths at a time, especially if you have a local hobby friend with an upcoming birthday. :-)

I've taken my two remaining pieces and taped the loose box "flap" back on to the flap that's still part of the wide box side. I like to use the single cardboard panel as the rear wall of the box booth, and the two taped together panels for the floor. Use quality packing tape, and your taped panel will be just as firm and sturdy as the single one; which you decide to use as a rear wall and which to use as the floor really comes down to preference. Usually one side will be a bit longer than the other, so you can flip your booth either way, depending on whether you need more height at the rear for a tall backdrop, or more length at the bottom for a deeper depth of field.


Finally, a finished DIY Box Photo Booth! I used some of the extra cardboard left over from Step One to make support triangles (remember I said those pieces would come in handy). These are a MUST if you want your box booth to stay upright and durable. How big to make the triangles is again a matter of preference, although I have found too big, and they can throw unwanted shadows into your photos, as well as block out out useful ground light; too small, and they don't provide enough support. You do need to place your triangles on the INSIDE edge of the booth corners (see insert pics). This makes the supports much stronger. I've also put squares of packing tape on the back of my booth, where I'll be taping up my backdrops. This helps keep repeated removal of backdrop tape from stripping the cardboard. I use painters tape to hold up my backdrops, as it's gentle and easily removed, so the packing tape squares aren't a must-have - it's just an extra feature I prefer to have. :-)
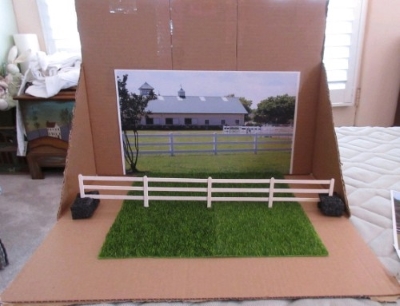
Here is my first Box Booth, version 1.0, that I made while visiting my family, all set up and ready to go. If you look closely, you can see for this photo session I used the taped together panels as the rear wall, and the single large panel as the floor. The craft paint on the coffee stick fence is nice and dry, with a pair of foam squares at each end to hold it up, and the dollhouse lawn pieces from Amazon turned out to be a close match with the backdrop I printed out on Mom's color printer. The backdrop is also DIY: I made it from a photo I took of a riding facility near my home. For anyone from Virginia Beach who thinks it looks familar, yes, that's a popular local landmark: the Equi-Kids Barn. :-)

One of the first show photos I took with Box Booth 1.0, using the setup from the previous pic. This was taken outdoors on a small patio table, on a sunny mid-afternoon. The camera is my trusty traveling companion of many years, an older model Canon Powershot pocket camera. "Rune Master", a Breyer Stablemate G3 Standing Thoroughbred, was customized by the wonderfully talented Karen Johnson to a striking Iberian Warmlbood. He has since been a winner in the show ring with this photo - proof you do NOT need expensive props, lighting, or photography equipment to get into photo showing!
Copyright © 2008-2024 Red Oak Ranch/redoakranchmodelhorses.com. All rights reserved. Unauthorized use of owner's original content is prohibited.
|